But it always got pushed
down the list.
One reason was I never
knew exactly what I wanted to do.
Another reason was I
didn’t want to spend much money on it.
Also, I always found
another project that I thought needed done NOW.
And last, it had doors! So
it was easy to shut the doors and ignore it. :)
Last week our dryer
stopped working.
Of course the only way you
know it is broke is when you intend on using it.
I hung out clothes on the
line. They froze!
Since the washer and dryer
had to come out to fix the dryer
it was the perfect time to
redo the laundry room.
But I did not get a before picture! SORRY!!!
(It was a basic laundry closet. White. Dusty. It had one lonely cabinet hung on the left hand side)
I had no budget for it.
I had no plans for what I
wanted to do.
I headed down stairs and
grabbed a full quart of paint
(it was a mis-mix picked
up a long time ago)
and an almost empty gallon
left over from our last house.
(yes I moved almost empty cans of paint with me)
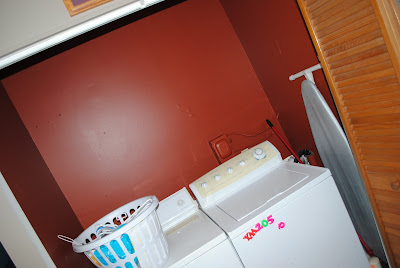
I dumped to paints together and painted away.
This is the color. Not bad!!!
The cabinet hung in the corner above the dryer (on the left side)
Then I had no plans from there.
It sat like this for a few days.
It sat like this for a few days.
Today I put my 1 year old cowgirl down for a nap and
headed out to the barn to get inspired.
We redid our corals this spring and I kept some of the old
boards in the barn.
I picked out a board that I liked and then hauled it back to the
house.
I measured and started to cut with the table saw.
I knew I wanted 2 ledges/shelves.
There is that funny little electrical box on the wall that limited my design options some.
I just used the remnant boards to use
as brackets.
I attached these to the wall then screwed the wood "shelf" into them
Then I hung the original cabinet on the side way and put up a shower curtain
rod up to hang clothes on.
I also attached a wicker basket under the shelf.
I simple screwed through the handle/rim directly into the wood
shelf.
Then it was the fun part. Accessorize!!!!!
This is the finished projects!
And best of all, it was FREE!!!!!!!!!!!!!!!!!!!!!!!!!!!!!!!!!!!!!!!!
I did not buy a thing.
Everything was on hand!
I had it all done before my husband came home for lunch!
He was really impressed.
My husband is very talented and I rely on him a lot to help out
with projects.
But it felt great to do this whole project from beginning to end
on my own


Wow I love those shelves! Looks great and you did it for free. That's awesome!
ReplyDeleteThank you so much! It was a fun, quick project and cheap :)
DeleteI look forard to seeing how your laundry room turns out!
WOW!!! Great laundry redo!!! Love it!!! LOVE, LOVE your family picture at the top of your blog!! Soooo cute!!! Following your from The Rustic Pig!
ReplyDeleteThank you! It was taken at our place! I love the view!!!
DeleteWhat a great idea! I love free projects that turn out well! Thanks for sharing this in the comments at Remodelaholic -- I've added it to our laundry room round-up so our readers can see it and come learn more. Have a wonderful day!
ReplyDeleteLorene and Cassity from Remodelaholic.com